Ansible netconf_conf Module
Coincidentally, Ansible Networking has had a NETCONF configuration module since Ansible release 2.2, which actually pre-dated the plugin. This module is used to perform the NETCONF edit-config operation. The module, like the plugin, has dependencies on the ncclient open source library to make edit-config RPCs. This module can be used to send configuration changes via RPCs in XML directly or through an XML source file. You will perform a combination of both in this section of the lab.
The documentation for this module can be found here: Ansible netconf_config
Configure XE, XR, & NX Interfaces using YANG & NETCONF
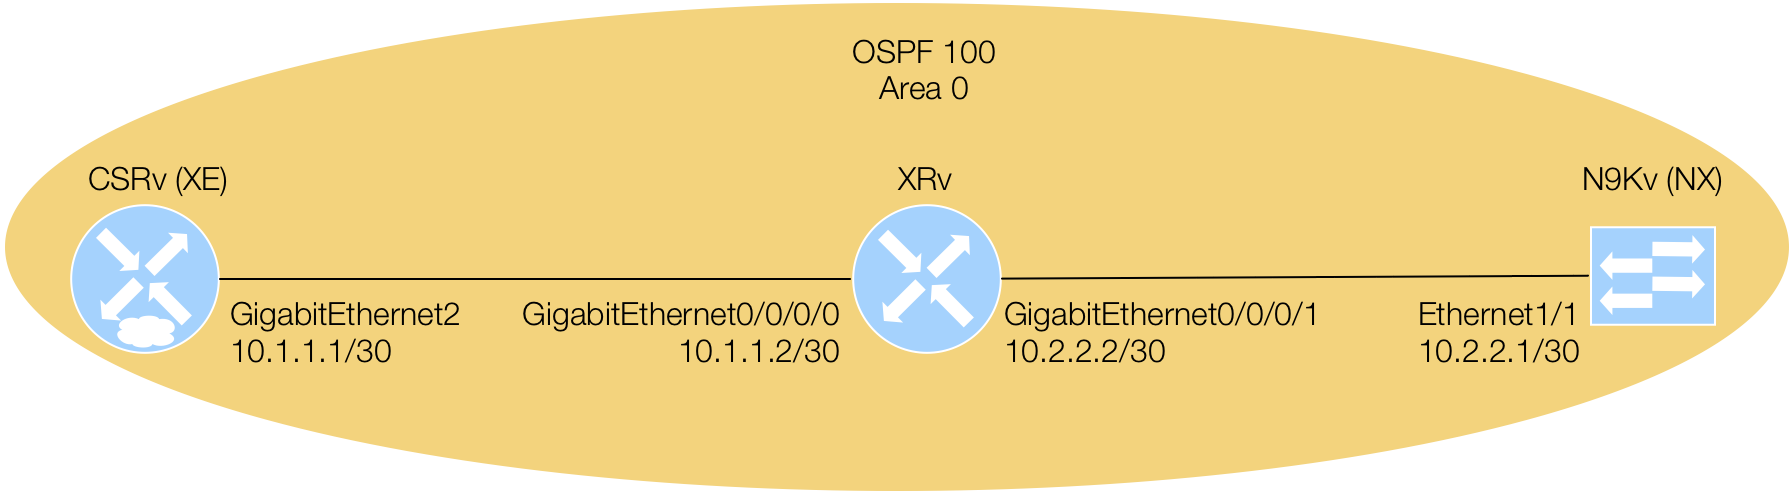
In each section below, you are going to modify the interface configuration of your XE, XR, and NX devices using NETCONF and different YANG model definitions per device. The interface configuration that you will modify will include the interface description, IP address, network mask, and state. On your XE device, you will leverage the IETF model definitions that you examined earlier for interfaces and IP. On your XR device, you will leverage the OpenConfig model definition for interfaces and IP. Lastly, on your NX device, you will leverage the the device's native YANG model.

As mentioned before, when using the netconf_config module, you will use a combination of input parameters for the XML based RPCs. The device role-based task for the XE device will use a source XML file that you will create. The device role-based task for the XR device will show you how to use a combination of a source file along with XML directly in the task. Lastly, the device role-based task for the NX device will demonstrate to you how to use multiple tasks with XML RCPs that perform different tasks that could easily be performed as one XML RPC task, but remember, breaking up the XML could provide for easier templating and reuse.
The Ansible netconf_config module requires some parameters that for simplicity in this lab, you
are going to set both look_for_keys and hostkey_verify to False. In
doing so, allow_agent will be set to False as well since we're keeping things simple
and not dealing with keys. There are two more important parameters to consider to operationalize this task. The
datastore parameter has a default setting value of auto where, using the advertised
device capabilities, it will try to determine whether to use the candidate datastore or running datastore. However,
from lessons learned and experience, it is highly recommended that you know and understand the datastore for
the device you are working with and set the datastore parameter accordingly. Lastly, you either need to use
the src or xml parameter. If using the src parameter, you would
provide a path to a valid edit-config XML RPC. If using the xml parameter, you would use the
valid edit-config XML RPC directly within in the task. Please examine what has been described in the
netconf_config examples below:
                    - name: THIS IS EXAMPLE 1
                      netconf_config:
                        look_for_keys: False
                        hostkey_verify: False
                        allow_agent: False
                        datastore: running
                        src: /playbooks/playbook-name/roles/role-name/files/rpc.xml
                    - name: THIS IS EXAMPLE 2
                      netconf_config:
                        look_for_keys: False
                        hostkey_verify: False
                        allow_agent: False
                        datastore: candidate
                        xml: |
                            <config>
                            </config>
Configure XE Interfaces using IETF YANG Models & NETCONF
For this configuration XML, copy the XML into a file in the specified directory. As a reminder,
since this RPC is used to modify the configuration using NETCONF's edit-config operation,
take note of the outer <config></config> elements. The elements that makeup the XML are composed
from the YANG container, leafs, lists, etc.
From the YANG model, notice that line 4 is the top-level container; interfaces.
Then, line 5 starts what could be a list of interfaces with interface and the leaf name
of that interface or the index key for that interface in the would be list. The description and
enabled are additional leaf elements at lines 7 and 9. Line 10 starts the use of an augmentation
using the the container ipv4. The subsequent highlighted lines from 11-13 include additional list
and leaf elements, such as ip.
            touch /workspace/playbooks/mdp_netconf/roles/xe-netconf/files/ietf-config-ints.xml
            cat <<EOF >> /workspace/playbooks/mdp_netconf/roles/xe-netconf/files/ietf-config-ints.xml
            <config>
              <interfaces xmlns="urn:ietf:params:xml:ns:yang:ietf-interfaces">
                <interface>
                  <name>GigabitEthernet2</name>
                  <description>Configured by Ansible NETCONF</description>
                  <type xmlns:ianaift="urn:ietf:params:xml:ns:yang:iana-if-type">ianaift:ethernetCsmacd</type>
                  <enabled>true</enabled>
                  <ipv4 xmlns="urn:ietf:params:xml:ns:yang:ietf-ip">
                    <address>
                      <ip>10.1.1.1</ip>
                      <netmask>255.255.255.252</netmask>
                    </address>
                  </ipv4>
                </interface>
              </interfaces>
            </config>

            EOF
For the XE device's task, copy the YAML into the appropriate YAML file. If you copy, the
proper file location is handled for you. For this task, you will set the datastore to running and
use the src parameter that has a value to the path of where your edit-config RPC is located.
            cat <<EOF >> /workspace/playbooks/mdp_netconf/roles/xe-netconf/tasks/main.yml

            - name: CONFIGURE XE INTERFACE GIG 2 USING NETCONF
              netconf_config:
                look_for_keys: False
                hostkey_verify: False
                allow_agent: False
                datastore: running
                src: /workspace/playbooks/mdp_netconf/roles/xe-netconf/files/ietf-config-ints.xml

            EOF
Configure XR Interfaces using OpenConfig YANG & NETCONF
For this configuration XML, copy the XML into a file in the specified directory. As a reminder,
since this RPC is used to modify the configuration using NETCONF's edit-config, take note of the
outer <config></config> elements.
From the OpenConfig YANG model, line 4 is the top-level container; interfaces.
Then, line 5 starts what could be a list of interfaces with interface and the leaf name
of that interface or the index key for that interface in the would be list. Line 8 has to match the key name of
the interface. The description and
enabled are additional leaf elements at lines 10 and 11. Line 13 starts the use of another container that
resides within the interfaces container called subinterfaces. Line 14 starts another element list that
is a subinterface. Line 15 shows 0 as to denote the physical interface. Lastly, an
augmentation is used with its container ipv4 at line 16 and subsequently another container
called addresses at line 17. The remaining highlighted lines from 18-22 include additional list
and leaf elements, such as ip.
            touch /workspace/playbooks/mdp_netconf/roles/xr-netconf/files/openconfig-config-ints.xml
            cat <<EOF >> /workspace/playbooks/mdp_netconf/roles/xr-netconf/files/openconfig-config-ints.xml
            <config>
                <interfaces xmlns="http://openconfig.net/yang/interfaces">
                    <interface>
                        <name>GigabitEthernet0/0/0/0</name>
                        <config>
                            <name>GigabitEthernet0/0/0/0</name>
                            <type xmlns:idx="urn:ietf:params:xml:ns:yang:iana-if-type">idx:ethernetCsmacd</type>
                            <enabled>true</enabled>
                            <description>Configured by Ansible NETCONF</description>
                        </config>
                        <subinterfaces>
                            <subinterface>
                                <index>0</index>
                                    <ipv4 xmlns="http://openconfig.net/yang/interfaces/ip">
                                        <addresses>
                                            <address>
                                                <ip>10.1.1.2</ip>
                                                    <config>
                                                        <ip>10.1.1.2</ip>
                                                        <prefix-length>30</prefix-length>
                                                    </config>
                                            </address>
                                        </addresses>
                                    </ipv4>
                            </subinterface>
                        </subinterfaces>
                    </interface>
                </interfaces>
            </config>

            EOF
For the XR device's tasks, copy the YAML into the appropriate YAML file. If you copy, the
proper file location is handled for you. For this task, you will set the datastore to candidate.
The first task will use the src parameter that has a value to the path of where your edit-config
RPC is located. The second task will make use of the xml parameter that uses the edit-config XML
directly. Again, this is simply to demonstrate the ability of how to use various combinations.
            cat <<EOF >> /workspace/playbooks/mdp_netconf/roles/xr-netconf/tasks/main.yml

            - name: CONFIGURE INTERFACE GIG 0/0/0/0 USING NETCONF
              netconf_config:
                look_for_keys: False
                hostkey_verify: False
                allow_agent: False
                datastore: candidate
                src: /workspace/playbooks/mdp_netconf/roles/xr-netconf/files/openconfig-config-ints.xml

            - name: CONFIGURE INTERFACE GIG 0/0/0/1 USING NETCONF
              netconf_config:
                look_for_keys: False
                hostkey_verify: False
                allow_agent: False
                datastore: candidate
                xml: |
                      <config>
                          <interfaces xmlns="http://openconfig.net/yang/interfaces">
                              <interface>
                                  <name>GigabitEthernet0/0/0/1</name>
                                  <config>
                                      <name>GigabitEthernet0/0/0/1</name>
                                      <type xmlns:idx="urn:ietf:params:xml:ns:yang:iana-if-type">idx:ethernetCsmacd</type>
                                      <enabled>true</enabled>
                                      <description>Configured by Ansible NETCONF</description>
                                  </config>
                                  <ethernet xmlns="http://openconfig.net/yang/interfaces/ethernet">
                                      <config>
                                          <auto-negotiate>false</auto-negotiate>
                                      </config>
                                  </ethernet>
                                  <subinterfaces>
                                      <subinterface>
                                          <index>0</index>
                                              <ipv4 xmlns="http://openconfig.net/yang/interfaces/ip">
                                                  <addresses>
                                                      <address>
                                                          <ip>10.2.2.2</ip>
                                                              <config>
                                                                  <ip>10.2.2.2</ip>
                                                                  <prefix-length>30</prefix-length>
                                                              </config>
                                                      </address>
                                                  </addresses>
                                              </ipv4>
                                      </subinterface>
                                  </subinterfaces>
                              </interface>
                          </interfaces>
                      </config>

            EOF
Configure NX Interfaces using Native YANG & NETCONF
For the NX device's tasks, copy the YAML into the appropriate YAML file. If you copy, the
proper file location is handled for you. For this task, you will set the datastore to running.
In this task file, you will breakup the XML RPC into more granular RPCs using the src parameter.
The first task will configure the interface as a Layer 3 interface, converting it from a Layer 2 interface, and
configure an interface description. The second task will configure the IP address and network mask of the
interface. The third task will enable the interface.
            cat <<EOF >> /workspace/playbooks/mdp_netconf/roles/nx-netconf/tasks/main.yml

            - name: CONFIGURE NX INTERFACE(S) DESCRIPTION USING NETCONF
              netconf_config:
                look_for_keys: False
                hostkey_verify: False
                allow_agent: False
                datastore: running
                xml: |
                    <config>
                        <System xmlns="http://cisco.com/ns/yang/cisco-nx-os-device">
                            <intf-items>
                                <phys-items>
                                    <PhysIf-list>
                                        <id>eth1/1</id>
                                        <descr>Configured by Ansible NETCONF</descr>
                                        <layer>Layer3</layer>
                                    </PhysIf-list>
                                </phys-items>
                            </intf-items>
                        </System>
                    </config>

            - name: CONFIGURE NX INTERFACE(S) IP ADDRESS USING NETCONF
              netconf_config:
                look_for_keys: False
                hostkey_verify: False
                allow_agent: False
                datastore: running
                xml: |
                    <config>
                        <System xmlns="http://cisco.com/ns/yang/cisco-nx-os-device">
                            <ipv4-items>
                                <inst-items>
                                    <adminSt>enabled</adminSt>
                                    <dom-items>
                                        <Dom-list>
                                            <name>default</name>
                                            <if-items>
                                                <If-list>
                                                    <id>eth1/1</id>
                                                    <addr-items>
                                                        <Addr-list>
                                                            <addr>10.2.2.1/30</addr>
                                                            <pref>1</pref>
                                                            <tag>0</tag>
                                                            <type>primary</type>
                                                        </Addr-list>
                                                    </addr-items>
                                                    <adminSt>enabled</adminSt>
                                                </If-list>
                                            </if-items>
                                        </Dom-list>
                                    </dom-items>
                                </inst-items>
                            </ipv4-items>
                        </System>
                    </config>

            - name: ENABLE INTERFACE(S) USING NETCONF
              netconf_config:
                look_for_keys: False
                hostkey_verify: False
                allow_agent: False
                datastore: running
                xml: |
                    <config>
                        <System xmlns="http://cisco.com/ns/yang/cisco-nx-os-device">
                            <intf-items>
                                <phys-items>
                                    <PhysIf-list>
                                        <id>eth1/1</id>
                                        <adminSt>up</adminSt>
                                    </PhysIf-list>
                                </phys-items>
                            </intf-items>
                        </System>
                    </config>

            EOF
Execute Ansible Playbook
With your hosts file created in the previous module and tasks developed to configure your device interface(s), you need to build the master play in the playbook and execute the playbook.
Copy the YAML file below that uses the roles you created.
            cat <<EOF >> /workspace/playbooks/mdp_netconf/site.yml
            ---
            # main playbook

            - hosts: xe
              roles:
                - role: xe-netconf

            - hosts: xr
              roles:
                - role: xr-netconf

            - hosts: nx
              roles:
                - role: nx-netconf

            EOF
Ensure you are in the correct working directory and execute the playbook:
cd /workspace/playbooks/mdp_netconf/
ansible-playbook -i hosts site.yml
Your playbook execution results should look like the below:
            PLAY RECAP *********************************************************************
            10.2.101.11                : ok=2    changed=1    unreachable=0    failed=0
            10.2.101.12                : ok=3    changed=2    unreachable=0    failed=0
            10.2.101.13                : ok=4    changed=3    unreachable=0    failed=0
In this section of the lab, you were introduced to using Ansible's NETCONF plugin and netconf_config configuration module to perform NETCONF edit-config RPCs. This was achieved using IETF, OpenConfig, and Native YANG model definitions across XE, XR, and NX respectively.
In the next section of the lab, you will leverage the same library that Ansible uses here to perform these RPCs, ncclient. You will use ncclient to not only perform configuration edits in Python, but also how to query or get-config to verify the configurations you are pushing to your devices. Please continue to the next lab section.