Get Interfaces Configured by Ansible
The previous section jumped right in making a configuration change to your devices in your network using
the Ansible framework and NETCONF's edit-config operation. As mentioned in the overview, NETCONF
has get and get-config operations. For these operations, NETCONF has a mechanism
mentioned in RFC 6241 for filtering exactly what configuration sections you wish to get back.
This is called subtree filtering. Subtree filtering can be done on:
- Namespaces
- Match Attribute Expressions
- Containment Nodes
- Selection Nodes
- Content Match Nodes
In the sections below, you will use get-config with a combination of subtree filtering on
namespaces and content matching on nodes.
Normally, a subtree filter would have to have outer <filter></filter> elements with the type
within the element heading equal to subtree; which would look something like this:
                <filter type="subtree">
                    <interfaces xmlns="urn:ietf:params:xml:ns:yang:ietf-interfaces"/>
                </filter>
However, using the Pythonic approach with ncclient and its get_config() method, has a
filter argument where you simply specify the filter type, in this case subtree, along
with the XML RPC that you want to get a configuration rpc-reply. In the sections of code that you work with
below, this will look something like this:
r = m.get_config('running', filter=('subtree', int_filter))
Remember, you always must specify the configuration datastore that you want to query as well, such as done
above.
There will be a netconf_get module coming in the near future that performs the NETCONF get and/or get-config operations in Ansible 2.6.
Get XE Interface Configured by Ansible
Return to Visual Studio Code and create a new Python file called ncclient_xe_get_int_config.py.
You can copy this file below for ease to name your file.
ncclient_xe_get_int_config.py
The code below is very similar from the previous file you created using the ncclient manager where you got each
device's capabilities. You will then see a variable called int_filter that
is set to hold a string XML RPC. The triple quote in Python is used here to expand the string multiple lines.
The XML could have been on a single line with normal single or double quotes, but that doesn't make it
very human readable. This filter, as you might be able to tell, uses the IETF interfaces definition, as was
used for the configuration.
You could also use the native XE definition.
Then, as mentioned above, you will use ncclient's get_config as a method to your instantiated
manager object. The CSRv/XE, at the moment, only supports the running datastore, so you must pass
"running" as a parameter, then the filter argument function where you specify the filter type
parameter as subtree and then finally, the actual XML-based filter using the filter variable.
Look over and copy the code below into you newly created Python file. Remember to save your code with Ctrl+s.
from ncclient import manager
def main():
"""
Main method that prints netconf capabilities of device.
"""
# Device dictionary that provides key/value connection information
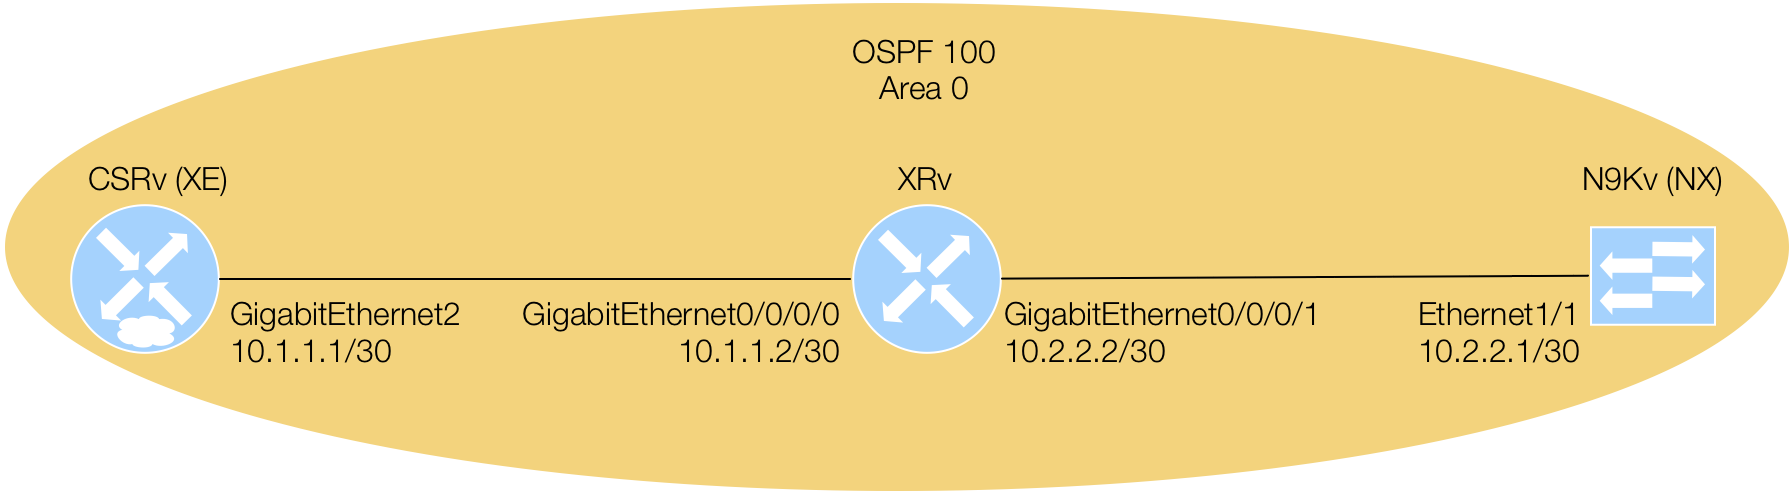
device = {"ip": "10.2.100.11", "port": "830", "platform": "csr",}
# ncclient manager instantiation for csr
with manager.connect(host=device['ip'], port=device['port'], username='admin',
password='cisco.123', hostkey_verify=False,
device_params={'name': device['platform']},
look_for_keys=False, allow_agent=False) as m:
# Filter using top-level container namespace and node matching
int_filter = '''
<interfaces xmlns="urn:ietf:params:xml:ns:yang:ietf-interfaces">
<interface>
<name>GigabitEthernet2</name>
</interface>
</interfaces>
'''
# get-config RPC against the running datastore using a subtree filter
reply = m.get_config('running', filter=('subtree', int_filter))
# Print RPC reply
print(reply)
if __name__ == '__main__':
main()
Return to your container in your Terminal to execute your Python script.
            cd /workspace/
            python3.6 ncclient_xe_get_int_config.py
In the RPC reply, you will notice the XML elements contain the configured interface description and IP address for the interface that you filtered on. This is what was configured by via Ansible using the IETF definition.
As you can see this is a way to get the XML configuration of an already configured device to potentially build configuration templates.
            [root@25ef0c91db80 workspace]# python3.6 ncclient_xe_get_int_config.py
            <?xml version="1.0" encoding="UTF-8"?>
            <rpc-reply xmlns="urn:ietf:params:xml:ns:netconf:base:1.0" message-id="urn:uuid:f6bd89d8-5bf9-42f3-aa05-a66966b1f450"
            xmlns:nc="urn:ietf:params:xml:ns:netconf:base:1.0"><data><interfaces xmlns="urn:ietf:params:xml:ns:yang:ietf-interfaces">
            <interface><name xmlns:nc='urn:ietf:params:xml:ns:netconf:base:1.0'>GigabitEthernet2</name><description>
            Configured by Ansible NETCONF</description><type xmlns:ianaift="urn:ietf:params:xml:ns:yang:iana-if-type">
            ianaift:ethernetCsmacd</type><enabled>true</enabled><ipv4 xmlns="urn:ietf:params:xml:ns:yang:ietf-ip"><address>
            <ip>10.1.1.1</ip><netmask>255.255.255.252</netmask></address></ipv4><ipv6 xmlns="urn:ietf:params:xml:ns:yang:ietf-ip">
            </ipv6></interface></interfaces></data></rpc-reply>
            [root@25ef0c91db80 workspace]#
This is like show run from the CLI, but is structured data that can be manipulated, templatized, etc. Feel free
to login to your show run interface GigabitEthernet2 to compare.
            Pod00-CSRv#show run interface gigabitEthernet2
            Building configuration...

            Current configuration : 162 bytes
            !
            interface GigabitEthernet2
             description Configured by Ansible NETCONF
             ip address 10.1.1.1 255.255.255.252
             negotiation auto
             no mop enabled
             no mop sysid
            end

            Pod00-CSRv#
Get XR Interface Configured by Ansible
Return to Visual Studio Code and create a new Python file called ncclient_xr_get_int_config.py.
You can copy this file name below for ease.
ncclient_xr_get_int_config.py
Following the same approach as you did for the XE platform above, you will use the same variable called
int_filter that is set to hold a string XML RPC. This time, the filter uses the OpenConfig
definition, just as it did for the initial configuration via Ansible NETCONF. Again, you could use the native
XR definition.
Ncclient's get_config manager object method will be used the same as above, except this time, you
will call it twice. The reason for this, is that XR platforms support both the running and candidate
datastore. If you're familiar with XR, then you know that for a configuration change to occur to the running
config, then a commit must occur, which is symbolic to the candidate datastore.
So, for your XRv, the code below will pass the string
"running" as a parameter, then the filter argument function where you specify the filter type
parameter as subtree and the then the actual XML-based filter using the filter variable. This is
repeated in setting the datastore parameter to the string "candidate".
Look over and copy the code below into you newly created Python file. Remember to save your code with Ctrl+s.
            from ncclient import manager


            def main():
                """
                Main method that prints netconf capabilities of device.
                """

                # Device dictionary that provides key/value connection information
                device = {"ip": "10.2.100.12", "port": "830", "platform": "iosxr",}

                # ncclient manager instantiation for iosxr
                with manager.connect(host=device['ip'], port=device['port'], username='admin',
                                     password='cisco.123', hostkey_verify=False,
                                     device_params={'name': device['platform']},
                                     look_for_keys=False, allow_agent=False) as m:

                    # Filter using top-level container namespace and node matching
                    int_filter = '''
                                <interfaces xmlns="http://openconfig.net/yang/interfaces">
                                    <interface>
                                        <name>GigabitEthernet0/0/0/0</name>
                                    </interface>
                                </interfaces>
                                '''

                    # get-config RPC against the running datastore using a subtree filter
                    reply_running = m.get_config('running', filter=('subtree', int_filter))

                    # Print RPC reply against running datastore
                    print(reply_running)

                    print('')

                    # get-config RPC against the candidate datastore using a subtree filter
                    reply_candidate = m.get_config('candidate', filter=('subtree', int_filter))

                    # Print RPC reply against candidate datastore
                    print(reply_candidate)


            if __name__ == '__main__':
                main()
Return to your container in your Terminal to execute your Python script.
            cd /workspace/
            python3.6 ncclient_xr_get_int_config.py
In the RPC reply, you will notice the XML elements contain the configured interface description and IP
address for the interface that you filtered on. This is what was configured by via Ansible using the OpenConfig
definition.
The running
and candidate datastores should be displayed and look the same.
            [root@25ef0c91db80 workspace]# python3.6 ncclient_xr_get_int_config.py
            <?xml version="1.0"?>
            <rpc-reply message-id="urn:uuid:f01fd3d2-bfc3-4c02-9a04-813650ecb36d" xmlns:nc="urn:ietf:params:xml:ns:netconf:base:1.0" xmlns="urn:ietf:params:xml:ns:netconf:base:1.0">
             <data>
              <interfaces xmlns="http://openconfig.net/yang/interfaces">
               <interface>
                <name>GigabitEthernet0/0/0/0</name>
                <config>
                 <name>GigabitEthernet0/0/0/0</name>
                 <type xmlns:idx="urn:ietf:params:xml:ns:yang:iana-if-type">idx:ethernetCsmacd</type>
                 <enabled>true</enabled>
                 <description>Configured by Ansible NETCONF</description>
                </config>
                <ethernet xmlns="http://openconfig.net/yang/interfaces/ethernet">
                 <config>
                  <auto-negotiate>false</auto-negotiate>
                 </config>
                </ethernet>
                <subinterfaces>
                 <subinterface>
                  <index>0</index>
                  <ipv4 xmlns="http://openconfig.net/yang/interfaces/ip">
                   <addresses>
                    <address>
                     <ip>10.1.1.2</ip>
                     <config>
                      <ip>10.1.1.2</ip>
                      <prefix-length>30</prefix-length>
                     </config>
                    </address>
                   </addresses>
                  </ipv4>
                 </subinterface>
                </subinterfaces>
               </interface>
              </interfaces>
             </data>
            </rpc-reply>


            <?xml version="1.0"?>
            <rpc-reply message-id="urn:uuid:77bec844-e7ae-4c4c-8809-2b99bff7807d" xmlns:nc="urn:ietf:params:xml:ns:netconf:base:1.0" xmlns="urn:ietf:params:xml:ns:netconf:base:1.0">
             <data>
              <interfaces xmlns="http://openconfig.net/yang/interfaces">
               <interface>
                <name>GigabitEthernet0/0/0/0</name>
                <config>
                 <name>GigabitEthernet0/0/0/0</name>
                 <type xmlns:idx="urn:ietf:params:xml:ns:yang:iana-if-type">idx:ethernetCsmacd</type>
                 <enabled>true<<enabled>
                 <description>Configured by Ansible NETCONF</description>
                </config>
                <ethernet xmlns="http://openconfig.net/yang/interfaces/ethernet">
                 <config>
                  <auto-negotiate>false</auto-negotiate>
                 </config>
                </ethernet>
                <subinterfaces>
                 <subinterface>
                  <index>0</index>
                  <ipv4 xmlns="http://openconfig.net/yang/interfaces/ip">
                   <addresses>
                    <address>
                     <ip>10.1.1.2</ip>
                     <config>
                      <ip>10.1.1.2</ip>
                      <prefix-length>30</prefix-length>
                     </config>
                    </address>
                   </addresses>
                  </ipv4>
                 </subinterface>
                </subinterfaces>
               </interface>
              </interfaces>
             </data>
            </pc-reply>

            [root@25ef0c91db80 workspace]#
This is like show run from the CLI, but is structured data that can be manipulated, templatized, etc. Feel free
to login to your show run interface GigabitEthernet0/0/0/0 and show run interface GigabitEthernet0/0/0/1 to compare.
            RP/0/RP0/CPU0:Pod00-XRv#show run interface gigabitEthernet 0/0/0/0
            Mon May 21 17:36:29.407 UTC
            interface GigabitEthernet0/0/0/0
             description Configured by Ansible NETCONF
             ipv4 address 10.1.1.2 255.255.255.252
            !

            RP/0/RP0/CPU0:Pod00-XRv#
            RP/0/RP0/CPU0:Pod00-XRv#show run interface gigabitEthernet 0/0/0/1
            Mon May 21 17:36:29.407 UTC
            interface GigabitEthernet0/0/0/1
             description Configured by Ansible NETCONF
             ipv4 address 10.2.2.2 255.255.255.252
            !

            RP/0/RP0/CPU0:Pod00-XRv#
Get NX Interface Configured by Ansible
Return to Visual Studio Code and create a new Python file called ncclient_nx_get_int_config.py.
You can copy this file name below for ease.
ncclient_nx_get_int_config.py
For your NX platform, you will follow the same approach as the previous two scripts. However, this time, you will make two RPC filters and calls due to how the NX native definitions are modeled (remember these are derived from the NX-API REST object model). The first filter is used to get the physical interface's related elements, such as the description or state. The second filter is used to get the IPv4 logical elements. Like XE, NX only supports the running datastore, thus that will used for the datastore parameter.
Look over and copy the code below into you newly created Python file. Remember to save your code with Ctrl+s.
            from ncclient import manager


            def main():
                """
                Main method that prints netconf capabilities of device.
                """

                # Device dictionary to use
                device = {"ip": "10.2.100.13", "port": "830", "platform": "nexus",}

                # ncclient manager instantiation for nexus
                with manager.connect(host=device['ip'], port=device['port'], username='admin',
                                     password='cisco.123', hostkey_verify=False,
                                     device_params={'name': device['platform']},
                                     look_for_keys=False, allow_agent=False) as m:

                    # Filter using top-level container namespace and node matching for physical interface
                    int_filter1 = '''
                                <System xmlns="http://cisco.com/ns/yang/cisco-nx-os-device">
                                    <intf-items>
                                        <phys-items>
                                            <PhysIf-list>
                                                <id>eth1/1</id>
                                            </PhysIf-list>
                                        </phys-items>
                                    </intf-items>
                                </System>
                                '''

                    # Filter using top-level container namespace and node matching for ipv4 interface
                    int_filter2 = '''
                                <System xmlns="http://cisco.com/ns/yang/cisco-nx-os-device">
                                    <ipv4-items>
                                        <inst-items>
                                            <dom-items>
                                                <Dom-list>
                                                    <if-items>
                                                        <If-list>
                                                            <id>eth1/1</id>
                                                        </If-list>
                                                    </if-items>
                                                </Dom-list>
                                            </dom-items>
                                        </inst-items>
                                    </ipv4-items>
                                </System>
                                '''

                    # get-config RPC against the running datastore using first subtree filter
                    r = m.get_config('running', filter=('subtree', int_filter1))

                    # Print RPC reply against running datastore
                    print(r)

                    # get-config RPC against the running datastore using second subtree filter
                    r = m.get_config('running', filter=('subtree', int_filter2))

                    # Print RPC reply against running datastore
                    print(r)


            if __name__ == '__main__':
                main()
            cd /workspace/
            python3.6 ncclient_nx_get_int_config.py
In the RPC reply, you will notice the XML elements contain the configured interface description and IP address for the interface that you filtered on. This is what was configured by via Ansible using the Native definition.
            [root@25ef0c91db80 workspace]# python3.6 ncclient_nx_get_int_config.py
            <?xml version="1.0" encoding="UTF-8"?>
            <rpc-reply xmlns:if="http://www.cisco.com/nxos:1.0:if_manager" xmlns:nfcli="http://www.cisco.com/nxos:1.0:nfcli" xmlns:nxos="http://www.cisco.com/nxos:1.0" xmlns:vlan_mgr_cli="http://www.cisco.com/nxos:1.0:vlan_mgr_cli" xmlns="urn:ietf:params:xml:ns:netconf:base:1.0" message-id="urn:uuid:115f9127-68b8-4f91-9dff-59acf5ac11b7">
                <data>
                    <System xmlns="http://cisco.com/ns/yang/cisco-nx-os-device">
                        <intf-items>
                            <phys-items>
                                <PhysIf-list>
                                    <id>eth1/1</id>
                                    <accessVlan>unknown</accessVlan>
                                    <adminSt>up</adminSt>
                                    <autoNeg>on</autoNeg>
                                    <beacon>off</beacon>
                                    <bw>0</bw>
                                    <delay>1</delay>
                                    <descr>Configured by Ansible NETCONF</descr>
                                    <dot1qEtherType>0x8100</dot1qEtherType>
                                    <duplex>auto</duplex>
                                    <eeep-items>
                                        <eeeLat>variable</eeeLat>
                                        <eeeLpi>aggressive</eeeLpi>
                                        <eeeState>not-applicable</eeeState>
                                    </eeep-items>
                                    <inhBw>4294967295</inhBw>
                                    <layer>Layer3</layer>
                                    <linkDebounce>100</linkDebounce>
                                    <linkDebounceLinkUp>0</linkDebounceLinkUp>
                                    <linkLog>default</linkLog>
                                    <loadp-items>
                                        <loadIntvl1>30</loadIntvl1>
                                        <loadIntvl2>300</loadIntvl2>
                                        <loadIntvl3>0</loadIntvl3>
                                    </loadp-items>
                                    <mdix>auto</mdix>
                                    <medium>broadcast</medium>
                                    <mode>access</mode>
                                    <mtu>1500</mtu>
                                    <nativeVlan>unknown</nativeVlan>
                                    <phys-items>
                                        <operLinkDebounce>100</operLinkDebounce>
                                    </phys-items>
                                    <physExtd-items>
                                        <allowMultiTag>disable</allowMultiTag>
                                        <bufferBoost>enable</bufferBoost>
                                        <routerMacIpv6Extract>disable</routerMacIpv6Extract>
                                        <stormCtrlBCastLevel>100.0</stormCtrlBCastLevel>
                                        <stormCtrlBCastPPS>4294967295</stormCtrlBCastPPS>
                                        <stormCtrlMCastLevel>100.0</stormCtrlMCastLevel>
                                        <stormCtrlMCastPPS>4294967295</stormCtrlMCastPPS>
                                        <stormCtrlUCastLevel>100.0</stormCtrlUCastLevel>
                                        <stormCtrlUCastPPS>4294967295</stormCtrlUCastPPS>
                                        <switchportVirtualEthernetBridge>disable</switchportVirtualEthernetBridge>
                                    </physExtd-items>
                                    <portT>unknown</portT>
                                    <priorflowctrl-items>
                                        <mode>0</mode>
                                    </priorflowctrl-items>
                                    <routerMac>not-applicable</routerMac>
                                    <rtvrfMbr-items>
                                        <tCl>l3Inst</tCl>
                                    </rtvrfMbr-items>
                                    <snmpTrapSt>enable</snmpTrapSt>
                                    <spanMode>not-a-span-dest</spanMode>
                                    <speed>auto</speed>
                                    <speedGroup>auto</speedGroup>
                                    <stormctrlp-items>
                                        <burstPps>4294967295</burstPps>
                                        <burstRate>100.0</burstRate>
                                        <rate>100.0</rate>
                                        <ratePps>4294967295</ratePps>
                                        <type>all</type>
                                    </stormctrlp-items>
                                    <trunkLog>default</trunkLog>
                                    <usage>discovery</usage>
                                    <userCfgdFlags/>
                                    <voicePortCos>-1</voicePortCos>
                                    <voicePortTrust>-1</voicePortTrust>
                                    <voiceVlanId>0</voiceVlanId>
                                    <voiceVlanType>none</voiceVlanType>
                                </PhysIf-list>
                            </phys-items>
                        </intf-items>
                    </System>
                </data>
            </rpc-reply>

            <?xml version="1.0" encoding="UTF-8"?>
            <rpc-reply xmlns:if="http://www.cisco.com/nxos:1.0:if_manager" xmlns:nfcli="http://www.cisco.com/nxos:1.0:nfcli" xmlns:nxos="http://www.cisco.com/nxos:1.0" xmlns:vlan_mgr_cli="http://www.cisco.com/nxos:1.0:vlan_mgr_cli" xmlns="urn:ietf:params:xml:ns:netconf:base:1.0" message-id="urn:uuid:3d81737e-d4b2-4a34-827a-7c472e63a705">
                <data>
                    <System xmlns="http://cisco.com/ns/yang/cisco-nx-os-device">
                        <ipv4-items>
                            <inst-items>
                                <dom-items>
                                    <Dom-list>
                                        <name>default</name>
                                        <if-items>
                                            <If-list>
                                                <id>eth1/1</id>
                                                <addr-items>
                                                    <Addr-list>
                                                        <addr>10.2.2.1/30</addr>
                                                        <pref>1</pref>
                                                        <tag>0</tag>
                                                        <type>primary</type>
                                                    </Addr-list>
                                                </addr-items>
                                                <adminSt>enabled</adminSt>
                                                <directedBroadcast>disabled</directedBroadcast>
                                                <forward>disabled</forward>
                                                <urpf>disabled</urpf>
                                            </If-list>
                                        </if-items>
                                    </Dom-list>
                                    <Dom-list>
                                        <name>management</name>
                                    </Dom-list>
                                </dom-items>
                            </inst-items>
                        </ipv4-items>
                    </System>
                </data>
            </rpc-reply>

            [root@25ef0c91db80 workspace]#
This is like show run from the CLI, but is structured data that can be manipulated, templatized, etc. Feel free
to login to your show run interface ethernet1/1 to compare. Further, you may have noticed above the significant amount of
data you were returned for NX. This is similar to what you may be familiar with in show run interface ethernet1/1 all.
You could get more granular with the filter if desired.
            Pod00-N9Kv# show run interface ethernet 1/1

            !Command: show running-config interface Ethernet1/1
            !Time: Mon May 21 17:35:46 2018

            version 7.0(3)I7(3)

            interface Ethernet1/1
              description Configured by Ansible NETCONF
              no switchport
              ip address 10.2.2.1/30
              no shutdown

            Pod00-N9Kv#
Continue to the next section where you will use ncclient for the edit-config operation, similar
to how Ansible NETCONF uses it, but you will develop the raw Python code.